Rafael Monnerat, Klaus Wölfel, Jingjing XU |
Configure ERP5 for SMB
Using the ERP5 Configurator
Small and Medium Business
In this tutorial you are going to learn how to configure your ERP5 instance for your company using the ERP5 Configurator. By using Configurator, you can have an ERP5 ready to use in few minutes, just by filling a few forms and waiting for the automated setup to do the hard job for you.
Standard Configuration
This configurator tutorial aims to configure one ERP5 instance for Small and Medium Business, and it should cover the most basic configuration that a SMB needs, like, Trade, Accounting, Document Management and others.
The Standard Configuration contains a pre-defined set of categories, modules, security which focus the most common ERP configuration scope for small and medium company world-wide. This configuration is appropriated to experiment and train yourself to ERP5 or use in production where this ERP configuration fits to the company needs.
| setTimeout | 60000 | |
| deleteCookie | LOCALIZER_LANGUAGE | |
| createCookie | LOCALIZER_LANGUAGE=en | |
| openAndWait | ${base_url}/view | |
| store | ${base_url}/portal_configurator | configurator_base_url |
| openAndWait | ${base_url}/Zuite_setUpConfigurationTest | |
| verifyTextPresent | Init Ok |
Configure your Site
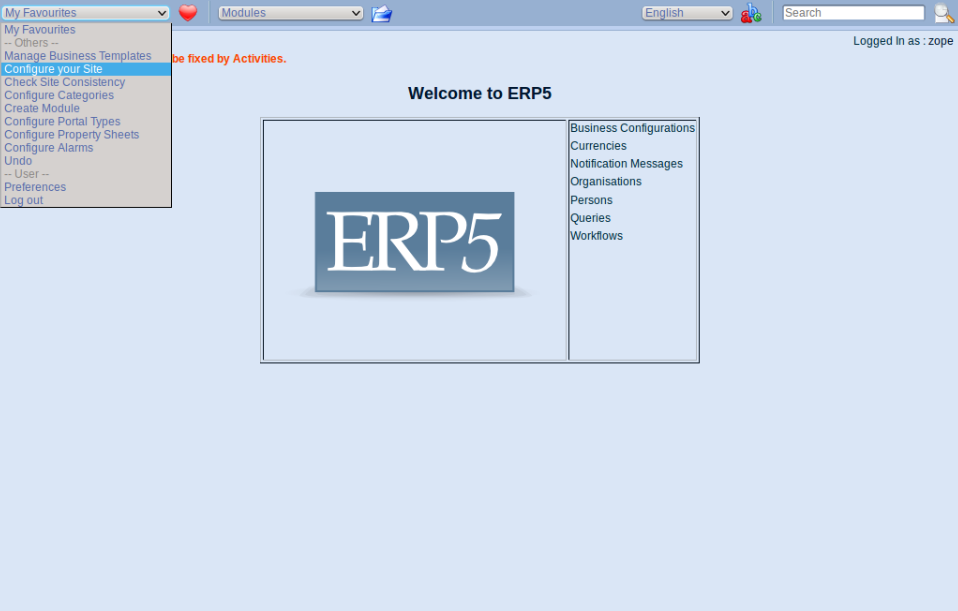
Use the "My favourites" Menu to select "Configure your Site" and start to configure your ERP5 Site. You will be redirected to the Configurator Tool.
Welcome to Configurator
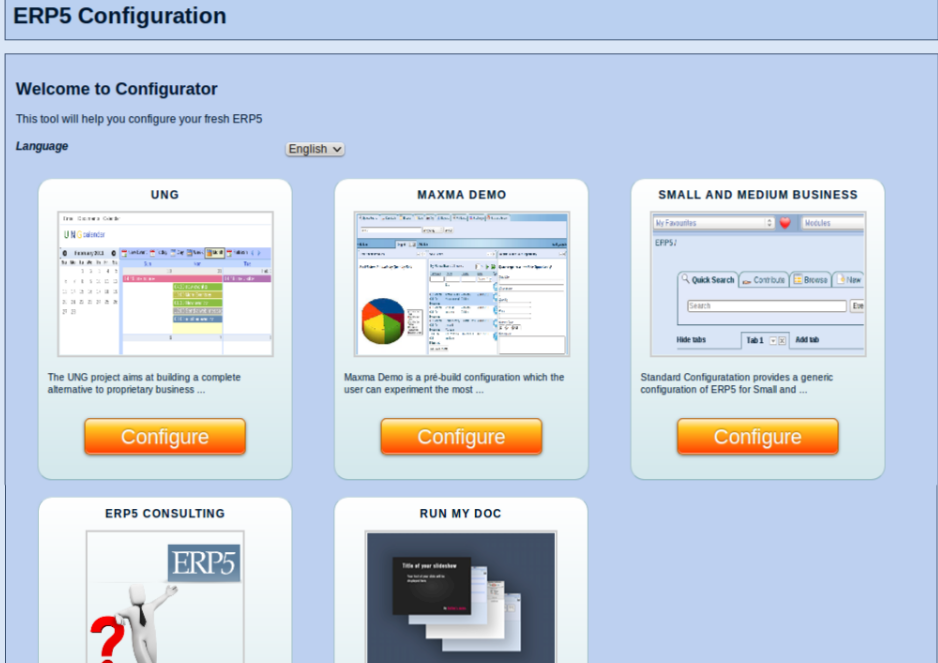
This is the Initial Page of the configurator, at this stage you can select whatever Configuration that you prefer. For this tutorial we are going to select SMALL AND MEDIUM BUSINESS.
| setTimeout | 1200000 | |
| openAndWait | ${base_url}/Zuite_waitForActivities | |
| verifyTextPresent | Done. | |
| setTimeout | 120000 | |
| pause | 4000 | |
| openAndWait | ${configurator_base_url}/view | |
| verifyTextPresent | Installation and configuration | |
| verifyTextPresent | Welcome to Configurator | |
| verifyTextPresent | This tool will help you configure your fresh ERP5 | |
| verifyTextPresent | Language | |
| verifyTextPresent | Installation and configuration | |
| clickAndWait | //button[@value='business_configuration_module/STANDARD_CONFIGURATOR_TEST'] |
Your Organisation
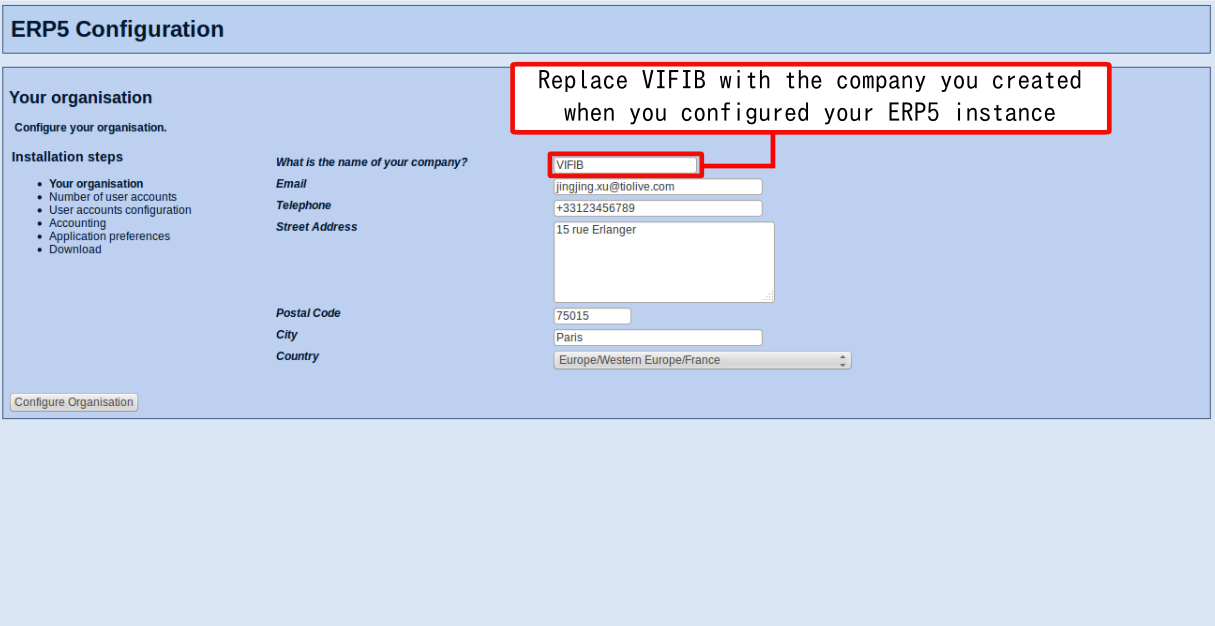
You will then have to fill all the information about your Company. It is important for you to enter the correct information as it wont be possible after the configuration to change them by yourself. Once it is done, just click on "Configure Organisation".
Note: You are configuring the ERP5 instance for your company, so please use the information of your company, such as Name, Email, Address, Country, and Users' information.
| verifyTextPresent | Installation and configuration | |
| verifyTextPresent | Installation steps | |
| verifyTextPresent | Number of user accounts | |
| verifyTextPresent | User accounts configuration | |
| verifyTextPresent | Accounting | |
| verifyTextPresent | Application preferences | |
| verifyTextPresent | Download | |
| verifyTextPresent | Your organisation | |
| verifyTextPresent | What is the name of your company? | |
| verifyTextPresent | ||
| verifyTextPresent | Telephone | |
| verifyTextPresent | Street Address | |
| verifyTextPresent | Postal Code | |
| verifyTextPresent | City | |
| verifyTextPresent | Country | |
| verifyElementPresent | //input[@name="next:method"] | |
| verifyValue | //input[@name="next:method"] | Configure Organisation |
| type | //input[@name="field_your_title"] | Nexedi SA |
| type | //input[@name="field_your_default_email_text"] | webproject-report@erp5.org |
| type | //input[@name="field_your_default_telephone_text"] | +123 234 567 891 |
| type | //textarea[@name="field_your_default_address_street_address"] | 270 bd Clémenceau, 59700 Marcq-en-Baroeul |
| type | //input[@name="field_your_default_address_zip_code"] | 59700 |
| select | //select[@name="field_your_default_address_region"] | Europe/Western Europe/France |
| clickAndWait | //input[@name="next:method"] | |
| verifyTextPresent | Input is required but no input given. | |
| verifyValue | //input[@name="field_your_title"] | Nexedi SA |
| verifyValue | //input[@name="field_your_default_email_text"] | webproject-report@erp5.org |
| verifyValue | //input[@name="field_your_default_telephone_text"] | +123 234 567 891 |
| verifyValue | //textarea[@name="field_your_default_address_street_address"] | 270 bd Clémenceau, 59700 Marcq-en-Baroeul |
| verifyValue | //input[@name="field_your_default_address_zip_code"] | 59700 |
| verifyValue | //select[@name="field_your_default_address_region"] | europe/western_europe/france |
| type | //input[@name="field_your_default_address_city"] | Lille |
| clickAndWait | //input[@name="next:method"] |
Number of user accounts
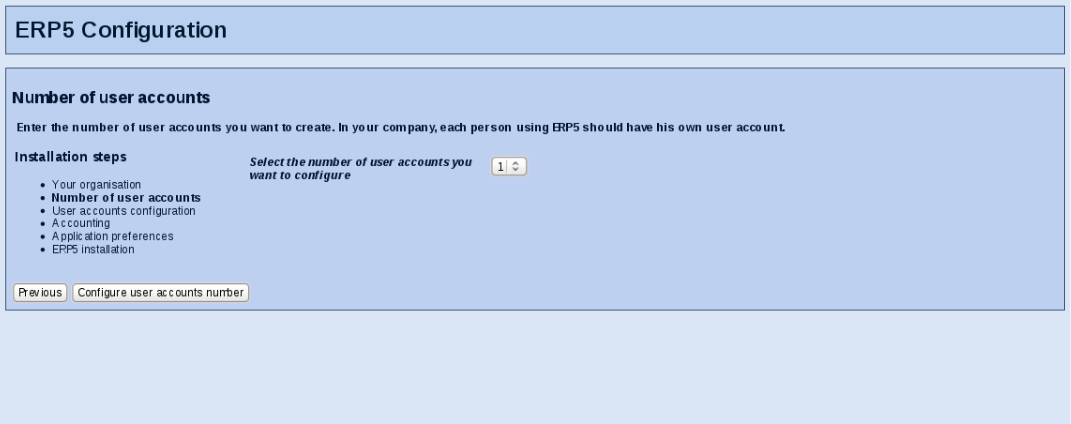
You will then have to choose how many user accounts you want to create during the configuration. You will be able to create as many users as you want even after the configuration. So you don't have to configure all the persons of your organisation that will use ERP5 now. Click on "Configure user accounts number".
| verifyTextPresent | Installation and configuration | |
| verifyTextPresent | Installation steps | |
| verifyTextPresent | Number of user accounts | |
| verifyTextPresent | User accounts configuration | |
| verifyTextPresent | Accounting | |
| verifyTextPresent | Application preferences | |
| verifyTextPresent | Download | |
| verifyTextPresent | Number of user accounts | |
| verifyTextPresent | Enter the number of user accounts you want to create. In your company, each person using ERP5 should have his own user account. | |
| verifyTextPresent | Select the number of user accounts you want to configure | |
| verifyElementPresent | //input[@name="next:method"] | |
| verifyValue | //input[@name="next:method"] | Configure user accounts number |
| verifyValue | //input[@name="previous:method"] | Previous |
| verifyElementPresent | //input[@name="previous:method"] | |
| clickAndWait | //input[@name="previous:method"] | |
| verifyTextPresent | Installation and configuration | |
| verifyTextPresent | Installation steps | |
| verifyTextPresent | Number of user accounts | |
| verifyTextPresent | User accounts configuration | |
| verifyTextPresent | Accounting | |
| verifyTextPresent | Application preferences | |
| verifyTextPresent | Download | |
| verifyTextPresent | Your organisation | |
| verifyTextPresent | What is the name of your company? | |
| verifyTextPresent | ||
| verifyTextPresent | Telephone | |
| verifyTextPresent | Street Address | |
| verifyTextPresent | Postal Code | |
| verifyTextPresent | City | |
| verifyTextPresent | Country | |
| verifyElementPresent | //input[@name="next:method"] | |
| verifyValue | //input[@name="next:method"] | Configure Organisation |
| verifyValue | //input[@name="field_your_title"] | Nexedi SA |
| verifyValue | //input[@name="field_your_default_email_text"] | webproject-report@erp5.org |
| verifyValue | //input[@name="field_your_default_telephone_text"] | +123 234 567 891 |
| verifyValue | //textarea[@name="field_your_default_address_street_address"] | 270 bd Clémenceau, 59700 Marcq-en-Baroeul |
| verifyValue | //input[@name="field_your_default_address_zip_code"] | 59700 |
| verifyValue | //select[@name="field_your_default_address_region"] | europe/western_europe/france |
| verifyValue | //input[@name="field_your_default_address_city"] | Lille |
| clickAndWait | //input[@name="next:method"] | |
| verifyTextPresent | Installation and configuration | |
| verifyTextPresent | Installation steps | |
| verifyTextPresent | Number of user accounts | |
| verifyTextPresent | User accounts configuration | |
| verifyTextPresent | Accounting | |
| verifyTextPresent | Application preferences | |
| verifyTextPresent | Download | |
| verifyTextPresent | Number of user accounts | |
| verifyTextPresent | Enter the number of user accounts you want to create. In your company, each person using ERP5 should have his own user account. | |
| verifyTextPresent | Select the number of user accounts you want to configure | |
| verifyElementPresent | //input[@name="next:method"] | |
| verifyValue | //input[@name="next:method"] | Configure user accounts number |
| verifyValue | //input[@name="previous:method"] | Previous |
| verifyElementPresent | //input[@name="previous:method"] | |
| select | //select[@name="field_your_company_employees_number"] | 1 |
| clickAndWait | //input[@name="next:method"] |
User accounts configuration
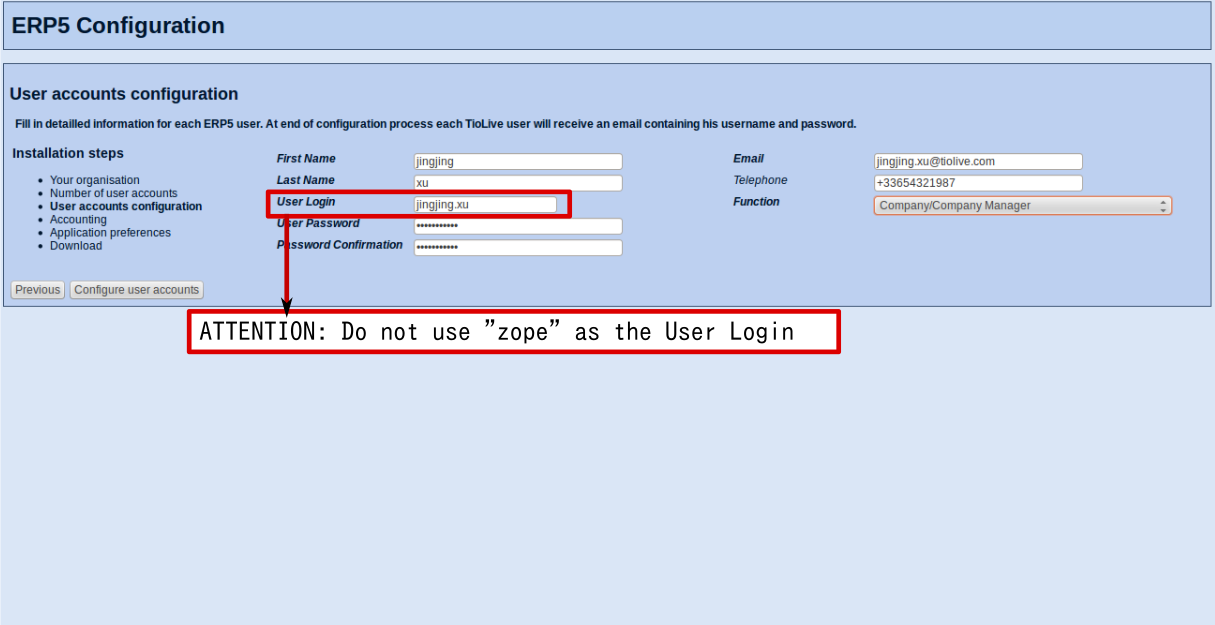
You will then have to fill in all the information for as many users as you selected before. ATTENTION: Do NOT use the username "zope". Please notice that in an online environment the useres will receive their login and password by email so be careful to enter the right email address. When it is done you can click on "Configure user accounts".
| verifyTextPresent | Installation and configuration | |
| verifyTextPresent | Installation steps | |
| verifyTextPresent | Number of user accounts | |
| verifyTextPresent | User accounts configuration | |
| verifyTextPresent | Accounting | |
| verifyTextPresent | Application preferences | |
| verifyTextPresent | Download | |
| verifyTextPresent | User accounts configuration | |
| verifyTextPresent | Fill in detailled information for each ERP5 user. | |
| verifyTextPresent | User accounts configuration | |
| verifyTextPresent | Fill in detailled information for each ERP5 user. | |
| verifyTextPresent | First Name | |
| verifyTextPresent | Last Name | |
| verifyTextPresent | User Login | |
| verifyTextPresent | User Password | |
| verifyTextPresent | Password Confirmation | |
| verifyTextPresent | Function | |
| verifyElementPresent | //input[@name="next:method"] | |
| verifyValue | //input[@name="next:method"] | Configure user accounts |
| verifyValue | //input[@name="previous:method"] | Previous |
| verifyElementPresent | //input[@name="previous:method"] | |
| type | //input[@name="field_your_first_name"] | Ivan |
| type | //input[@name="field_your_last_name"] | Petrov |
| type | //input[@name="field_your_reference"] | PERSON_RESERVED_REFERENCE |
| type | //input[@name="field_your_password"] | secret |
| type | //input[@name="field_your_password_confirm"] | secret |
| select | //select[@name="field_your_function"] | Company/Company Manager |
| type | //input[@name="field_your_default_email_text"] | webproject-report@erp5.org |
| clickAndWait | //input[@name="next:method"] | |
| verifyTextPresent | User login is either already used or contains invalid characters | |
| verifyTextPresent | Please try another one | |
| type | //input[@name="field_your_reference"] | PERSON_USER_REFERENCE |
| clickAndWait | //input[@name="next:method"] |
Accounting
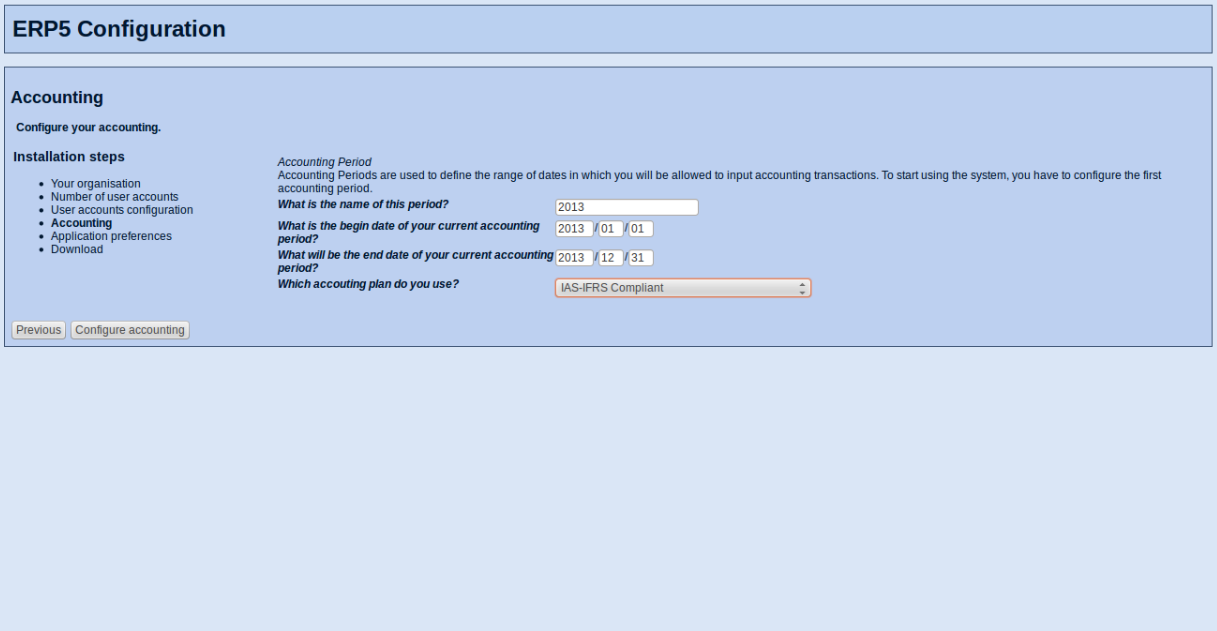
You will then have to choose the accounting plan you want to use (If the accounting plan that you want to use is not available, we can teach you how to make your accounting plan available in ERP5). Then you have to enter the accounting period beginning date, the ending date and the name of the accounting period. When it is done you can click on "Configure accounting".
| verifyTextPresent | Installation and configuration | |
| verifyTextPresent | Installation steps | |
| verifyTextPresent | Number of user accounts | |
| verifyTextPresent | User accounts configuration | |
| verifyTextPresent | Accounting | |
| verifyTextPresent | Application preferences | |
| verifyTextPresent | Download | |
| verifyTextPresent | Accounting | |
| verifyTextPresent | Configure your accounting. | |
| verifyTextPresent | Which accouting plan do you use? | |
| verifyTextPresent | Accounting Period | |
| verifyTextPresent | Accounting Periods are used to define the range of dates in which you will be allowed to input accounting transactions. | |
| verifyTextPresent | To start using the system, you have to configure the first accounting period. | |
| verifyTextPresent | What is the begin date of your current accounting period? | |
| verifyTextPresent | What will be the end date of your current accounting period? | |
| verifyTextPresent | What is the name of this period? | |
| verifyElementPresent | //input[@name="next:method"] | |
| verifyValue | //input[@name="next:method"] | Configure accounting |
| verifyValue | //input[@name="previous:method"] | Previous |
| verifyElementPresent | //input[@name="previous:method"] | |
| verifyValue | //input[@name="subfield_field_your_period_start_date_year"] | 2012 |
| verifyValue | //input[@name="subfield_field_your_period_start_date_month"] | 01 |
| verifyValue | //input[@name="subfield_field_your_period_start_date_day"] | 01 |
| verifyValue | //input[@name="subfield_field_your_period_stop_date_year"] | 2012 |
| verifyValue | //input[@name="subfield_field_your_period_stop_date_month"] | 12 |
| verifyValue | //input[@name="subfield_field_your_period_stop_date_day"] | 31 |
| verifyValue | //input[@name="field_your_period_title"] | 2012 |
| clickAndWait | //input[@name="next:method"] |
Application Preferences
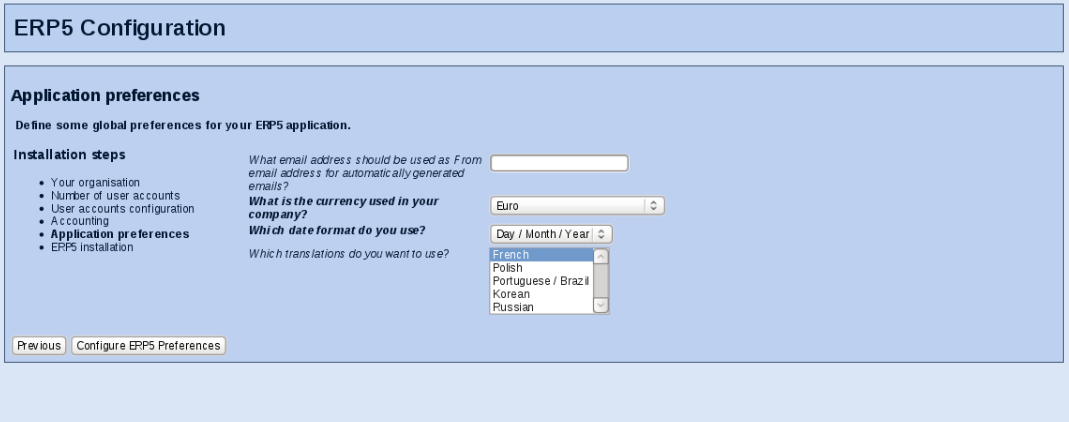
You will then have to choose the "from" email address of your account. This email address will be used for automatically generated emails. You have to select the default accounting currency and the languages that you want to be available in your instance. English will always be available, other languages have to be installed during the configuration process. When it is done you can click on "Configure ERP5 Preferences".
| verifyTextPresent | Installation and configuration | |
| verifyTextPresent | Installation steps | |
| verifyTextPresent | Number of user accounts | |
| verifyTextPresent | User accounts configuration | |
| verifyTextPresent | Accounting | |
| verifyTextPresent | Application preferences | |
| verifyTextPresent | Download | |
| verifyTextPresent | Application preferences | |
| verifyTextPresent | Define some global preferences for your ERP5 application. | |
| verifyTextPresent | What email address should be used as From email address for automatically generated emails? | |
| verifyTextPresent | What is the currency used in your company? | |
| verifyTextPresent | Which date format do you use? | |
| verifyTextPresent | Which translations do you want to use? | |
| verifyElementPresent | //input[@name="next:method"] | |
| verifyValue | //input[@name="next:method"] | Configure ERP5 Preferences |
| verifyValue | //input[@name="previous:method"] | Previous |
| verifyElementPresent | //input[@name="previous:method"] | |
| select | //select[@name="field_your_price_currency"] | Euro |
| select | //select[@name="field_your_preferred_date_order"] | Day / Month / Year |
| addSelection | //select[@name="field_your_lang"] | label=French |
| clickAndWait | //input[@name="next:method"] |
Summary
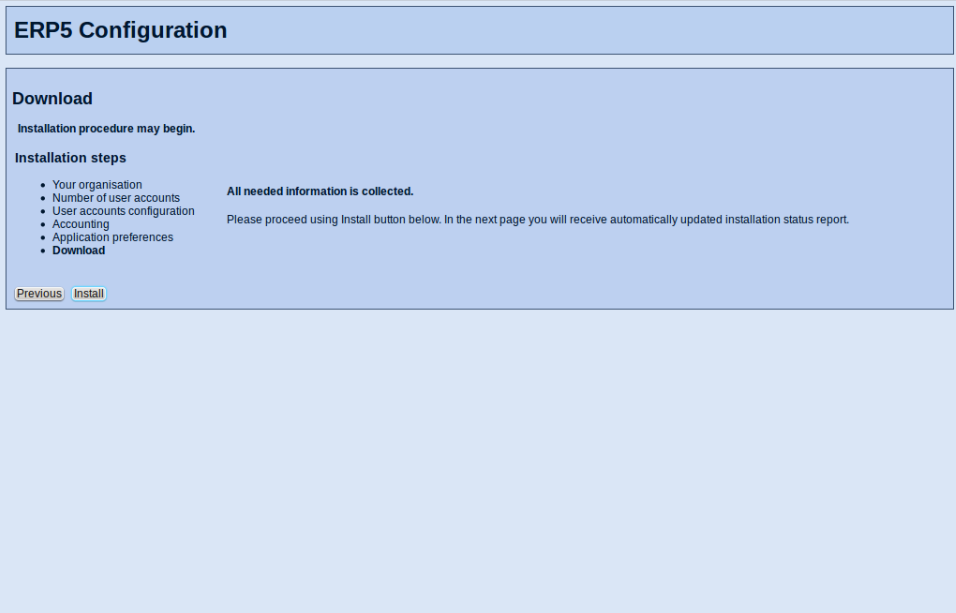
This step is to say that we have all the information needed for the installation. It is still possible to go back and correct wrong information, but once you will have clicked on 'Install' it won't be possible anymore. When you are sure of the information you filled, you can click on "Install".
| verifyTextPresent | Installation and configuration | |
| verifyTextPresent | Installation steps | |
| verifyTextPresent | Number of user accounts | |
| verifyTextPresent | User accounts configuration | |
| verifyTextPresent | Accounting | |
| verifyTextPresent | Application preferences | |
| verifyTextPresent | Download | |
| verifyTextPresent | Download | |
| verifyTextPresent | Installation procedure may begin | |
| verifyTextPresent | You are going to install your selected configuration. | |
| verifyTextPresent | Please proceed using Install button below. | |
| verifyTextPresent | In the next page you will receive automatically updated installation status report. | |
| verifyElementPresent | //input[@name="next:method"] | |
| verifyValue | //input[@name="next:method"] | Install |
| verifyValue | //input[@name="previous:method"] | Previous |
| verifyElementPresent | //input[@name="previous:method"] | |
| clickAndWait | //input[@name="next:method"] |
Installation
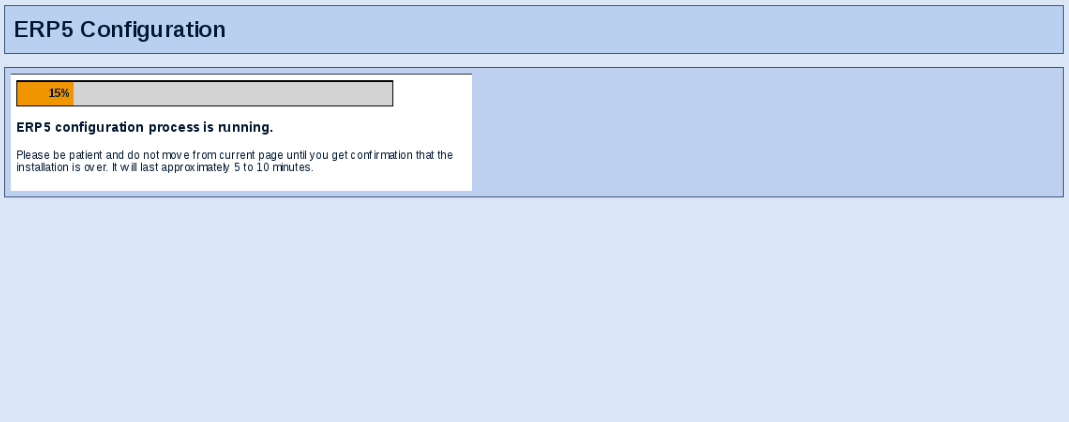
You can follow the installation progress thanks to the "installation progress bar". Even if you quit the page, you won't be able to stop the installation process. Once it is done you will see a link at the end of the progress bar that will invite you to login to your ERP5 Instance. If you are running ERP5 in a virtual machine on a slow computer it could happen that you get a message "Error code 500". Don't worry, this only means that it takes a long time to configure ERP. In this case, just wait some more minutes and then return to your ERP5 instance (in the virtual machine you can do this by clicking the home button). Then you have to click "My Favourites" -> "Log out" to log out from the emergency user. Then you can log in again using your user you just created.
| waitForCondition | selenium.isTextPresent("Installation and configuration process is running.") | 10000 |
| verifyTextPresent | Please be patient and do not move away from current page until you get a | |
| verifyTextPresent | confirmation that the installation is over. | |
| verifyTextPresent | It will last approximately 20 to 30 minutes. | |
| setTimeout | 1200000 | |
| openAndWait | ${base_url}/Zuite_waitForActivities | |
| verifyTextPresent | Done. | |
| setTimeout | 30000 | |
| openAndWait | ${base_url}/Zuite_assertEndConfiguration | |
| verifyTextPresent | True | |
| openAndWait | ${base_url}/view | |
| verifyTextPresent | ${base_user} | |
| openAndWait | ${base_url}/logout | |
| openAndWait | ${base_url}/login_form | |
| type | //input[@name="__ac_name"] | PERSON_USER_REFERENCE |
| type | //input[@name="__ac_password"] | secret |
| clickAndWait | //input[@name="logged_in:method"] | |
| openAndWait | ${base_url}/view | |
| verifyTextPresent | PERSON_USER_REFERENCE | |
| openAndWait | ${base_url}/Zuite_waitForActivities | |
| verifyTextPresent | Done. | |
| setTimeout | 30000 | |
| openAndWait | ${base_url}/login_form | |
| type | //input[@name="__ac_name"] | ${base_user} |
| type | //input[@name="__ac_password"] | |
| clickAndWait | //input[@name="logged_in:method"] |
Start using your new ERP5 system
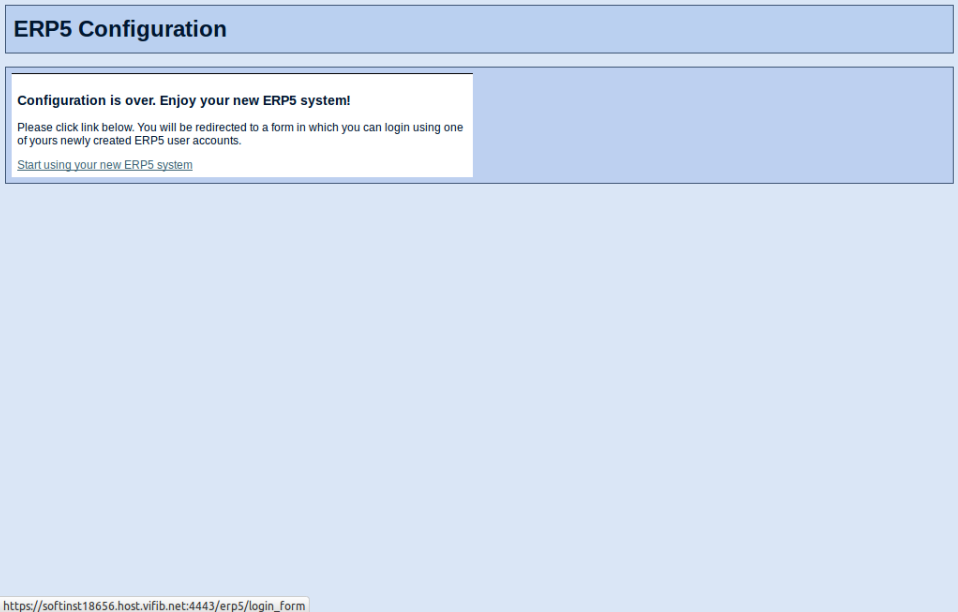
As soon the link is provided, click "Start using your new ERP5 system" to use your configured ERP5.
Login
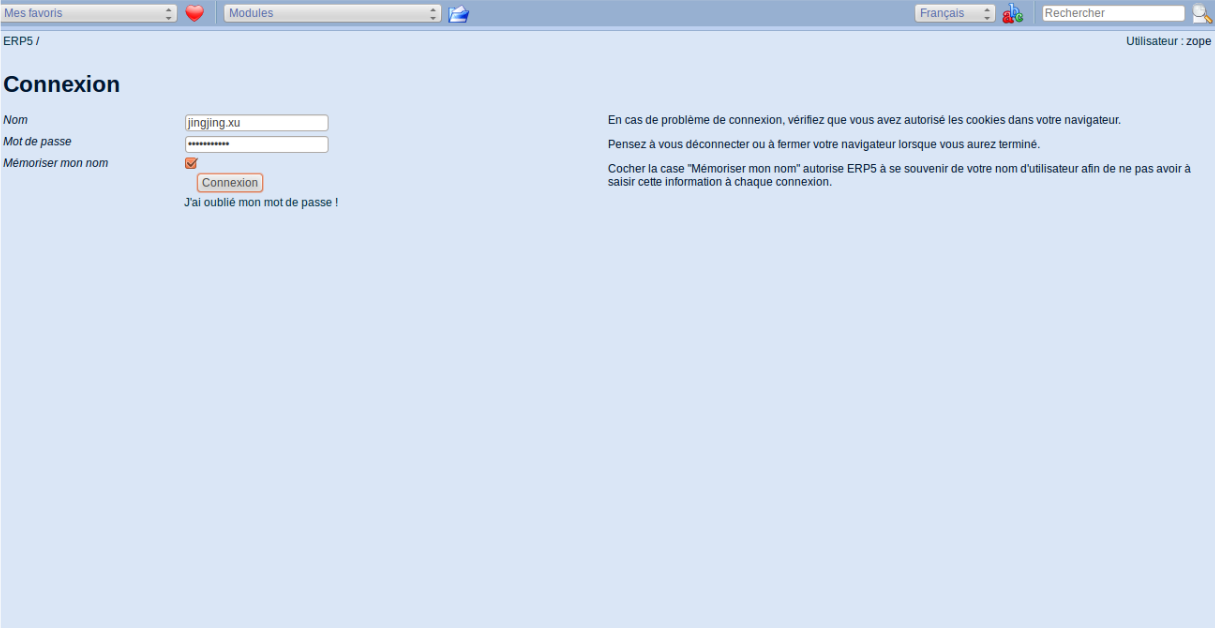
Now you can login with the user Login and Password created during the configuration and enjoy your ERP5.
Thank You
- Rapid.Space
- 147 Rue du Ballon
- 59110 La Madeleine
- France
- +33629024425
- contact (@) rapid.space
For more information, please contact Jean-Paul, CEO of Rapid.Space (+33 629 02 44 25).