Add Temporary IPv6 Address
sudo su

# include temporary IPv6 on lo
ip -6 addr add fc01::1/32 dev lo
Head to the terminal and access your server. As COMP-0 will later provide Re6st and IPv6 to the SlapOS network, there likely is no IPv6 available at this point. You need to add a temporary IPv6 address range as shown in the code above.
Rationale: SlapOS requires IPv6 internally and uses Re6st, which will be installed later to enable IPv6 in heterogeneous environments (distributed machines, different types).
You will later deploy and instantiate a Re6st registry on COMP-0 to provide IPv6 and Re6st access tokens. However, in order to deploy it, SlapOS needs to be installed and to install SlapOS, IPv6 is required. Thus, we use a temporary IPv6 address range until the Registry is available, at which point it will be removed again before correctly installing Re6st with IPv6 automatically being added.
Single Line Installer
sudo su
# wget deploy.erp5.net/slapos && bash slapos

...

What is the url to the SlapOS Master API? [https://slap.vifib.com/]:
What is the url to the SlapOS Master Website? [https://slapos.vifib.com/]:
What is this computer name? [noname]:
If you have slapos token if you have? [notoken]:
Continue and use the single line installer. You will be asked several questions during the installation. You are connecting to your own master, so on the first question, please point to port 5443 of your master's IPv4 adress (https://[IPv4]:5443), or you can use the integrated Apache from your master (the ERP5 zope IPv6 URL, such as https://[ipv6_addr]:2152) and on the second question, please add your SlapOS Master dashboard url https://[IPv4]:443/erp5/web_site_module/hostingjs/
Choose a name for your computer to identify it in your network and finally enter the association token you have received earlier. The installation can be repeated in case something goes wrong or you would like to change some of the entered parameters.
Once the installation has finishes without errors, you should see:
...
PLAY RECAP *********************************************************************
127.0.0.1                  : ok=12   changed=4   unreachable=0   failed=0
In case installation fails and you want to start over, you need to request a new token as mentioned above and, depending on whether already created, remove any existing configuration in /etc/opt/slapos/slapos.cfg before restarting.
You can verify that SlapOS was installed by trying:
# slapos node
watchdog                   RUNNING   pid 13270, uptime 0:00:03
And (re)formatting the SlapOS node:
# slapos node format --now
2018-04-21 13:07:29 slapos[13279] INFO Updating Computer
2018-04-21 13:07:30 slapos.format[13279] INFO Partition resources saved to slappart0
2018-04-21 13:07:30 slapos.format[13279] INFO Partition resources saved to slappart1
2018-04-21 13:07:30 slapos.format[13279] INFO Partition resources saved to slappart2
2018-04-21 13:07:30 slapos.format[13279] INFO Partition resources saved to slappart3
2018-04-21 13:07:30 slapos.format[13279] INFO Partition resources saved to slappart4
2018-04-21 13:07:30 slapos.format[13279] INFO Partition resources saved to slappart5
2018-04-21 13:07:30 slapos.format[13279] INFO Partition resources saved to slappart6
2018-04-21 13:07:30 slapos.format[13279] INFO Partition resources saved to slappart7
2018-04-21 13:07:30 slapos.format[13279] INFO Partition resources saved to slappart8
2018-04-21 13:07:30 slapos.format[13279] INFO Partition resources saved to slappart9
2018-04-21 13:07:30 slapos[13279] INFO Posting information to 'https://54.37.31.108:
  5443/'
2018-04-21 13:07:30 slapos[13279] INFO slapos successfully prepared the computer.
Frontend Service Configuration

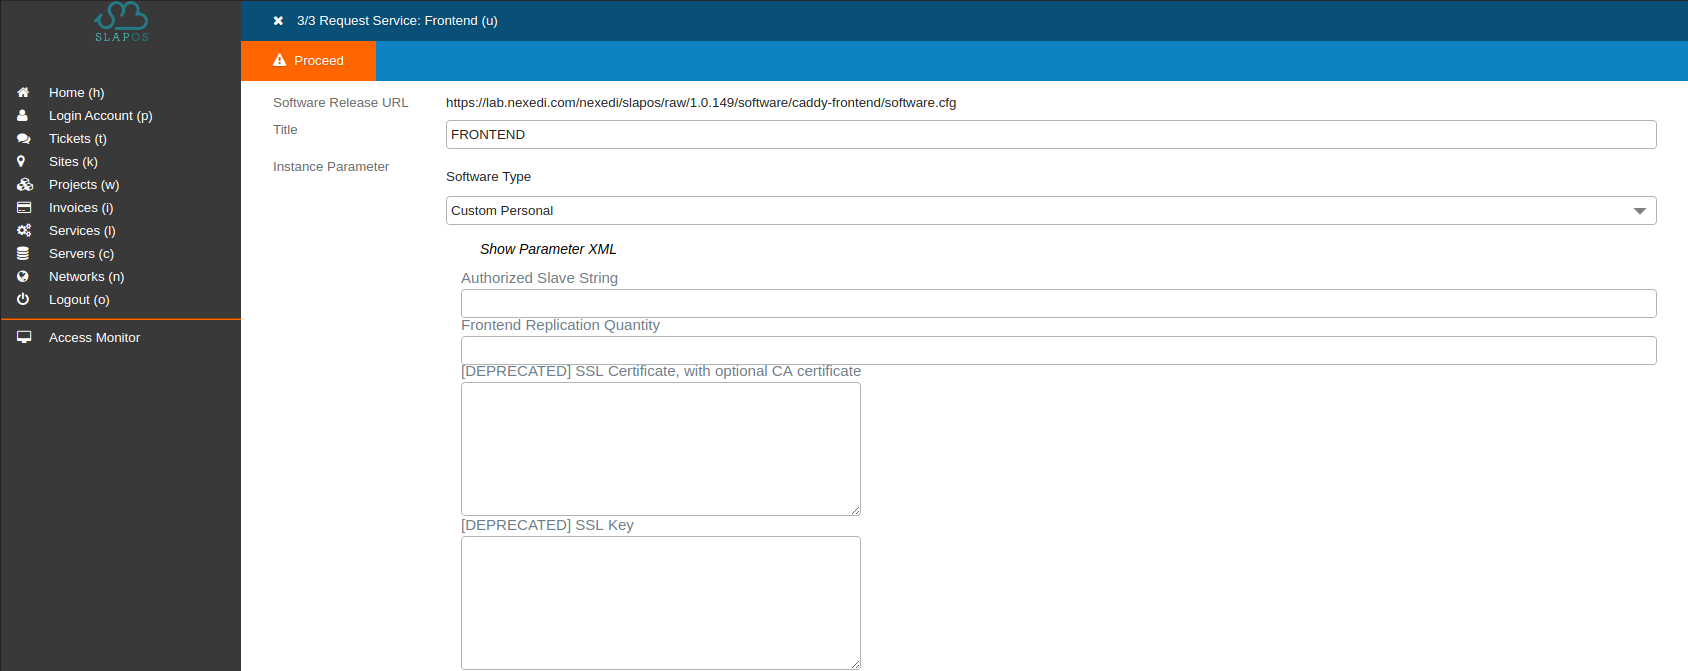
You will reach the Frontend configuration menu. It contains a form of software-specific parameters as well as a generic XML configuration field (hidden by default - click the "Show Parameter XML" button to display).
Select Software-Type custom personal, then fill the form. Don't forget to give the Frontend a title and make sure you select the computer you created at the end of the form. Otherwise the SlapOS Master will look by itself on which node the instance should be created (not relevant in this case as there is only one computer).
Fill the form like this :
- Title: FRONTEND
- Software type: Custom Personal
- Public IPv4: [IP_OF_YOUR_SERVER]
- IPReadLimit: 40
- Test Verification URL:
https://www.erp5.com/getId
- Apache Key:[AAA]
- Apache Certificate: [BBB]
- Apache CA Certificate: [CCC]
- Domain: [domain]
- Computer: [COMP-XXXX]
Alternatively, you can choose to click on the "Show parameter XML" button and fill the following XML configuration parameters:
<?xml version="1.0" encoding="utf-8"?>
<instance>
    <parameter id="public-ipv4">[IP_OF_YOUR_SERVER]</parameter>
    <parameter id="ip-read-limit">40</parameter>
    <parameter id="re6st-verification-url">https://www.erp5.com/getId</parameter>
    <parameter id="apache-key">[AAA]</parameter>
    <parameter id="apache-certificate">[BBB]</parameter>
    <parameter id="apache-ca-certificate">[CCC]</parameter>
    <parameter id="domain">[domain]</parameter>
    <parameter id="-frontend-quantity">1</parameter>
    <parameter id="-frontend-type">custom-personal</parameter>
    <parameter id="-sla-1-computer_guid">[COMP-XXXX]</parameter>
</instance>
using:
[IP_OF_YOUR_SERVER]: IPv4 address of your slave server (debian@xxx.this.one.xxx)[AAA]: ssl key (privkey.pem)[BBB]: ssl certificate (cert.pem)[CCC]: ssl ca certificate (chain.pem)[domain]: the domain you are using (here: slaptest.erp5.net)[COMP-XXXX]: computer where the partition for this Frontend will be created.
Click Proceed to start instantiation.
Instantiation and Port Forwarding

Refresh the list of current services to show the new service and status.
You can follow the compilation progress by looking at the slapos-node-instance.log using:
# tail /opt/slapos/log/slapos-node-instance.log -f
or calling # slapos node instance in the terminal directly.
The Frontend will be installed inside a computer partition and will listen on ports 8080 and 4443. Since permissions in Linux systems prevent users from accessing ports smaller than 1024, incoming traffic on public ports 80 and 443 has to be forwarded to the correct ports the Frontend is listening on.
This can be done using a Firewall with NAT traversal or using Socat. We will use Socat, a relay for bidirectional data transfer between two independent data channels. Data channels can be files, pipes, devices (terminal or modem, etc.), or sockets (Unix, IP4, IP6 - raw, UDP, TCP), etc. For more information, please refer to the Free Software Directory).
To install socat, head to your terminal and:
sudo su
# sudo apt-get install socat
Find the IPv6 addresses used by the Frontend in its configuration folder:
root@slapostest2:/# cat /srv/slapgrid/slappart*/etc/apache_frontend.conf | grep "Listen"
Listen 10.0.176.4:8080
Listen 10.0.176.4:4443
Listen [fc01::xxxx]:8080
Listen [fc01::xxxx]:4443


Use the IPv6 adresses for ports 8080 and 4443.
Listen [fc01::e5d4]:8080
Listen [fc01::e5d4]:4443
Then call socat:
root@slapostest2:/# socat  TCP4-LISTEN:80,fork TCP6:[fc01::xxxx]:8080 &
socat TCP4-LISTEN:443,fork TCP6:[fc01::xxxx]:4443 &
To see whether your bindings are active, you can
root@slapostest2:/# ps aux | grep socat
debian    4299  0.0  0.0  12728  2208 pts/0    S+   11:04   0:00 grep socat
root     24449  0.0  0.0  19644  2696 ?        S    Mar20   0:00 socat
  TCP4-LISTEN:80,fork TCP6:[fc01::xxxx]:8080
root     24674  0.0  0.0  19644  2604 ?        S    Mar20   0:00 socat
  TCP4-LISTEN:443,fork TCP6:[fc01::xxxx]:4443
You can also verify that the port forwarding is working by accessing your Frontend url (in our case) foobar.slaptest.erp5.net in a browser. If successful, the listener should forward to the IPv6 address the Frontend is listening on and you should see the following:
This instance has not been found.
If this error persists, please check your instance URL and status on SlapOS Master.
In case the Frontend is not or no longer accessible, you can check on your node by:
sudo su
# slapos node
slappart8:bootstrap-monitor                EXITED    May 22 04:16 PM
slappart8:certificate_authority-on-watch   RUNNING   pid 891, uptime 16:51:03
slappart8:crond-on-watch                   RUNNING   pid 883, uptime 16:51:03
slappart8:frontend-apache-safe-graceful    EXITED    May 22 04:16 PM
slappart8:frontend-nginx-safe-graceful     EXITED    May 22 04:16 PM
slappart8:frontend_apache-on-watch         RUNNING   pid 887, uptime 16:51:03
slappart8:frontend_nginx-on-watch          RUNNING   pid 889, uptime 16:51:03
slappart8:monitor-httpd-graceful           EXITED    May 22 04:16 PM
slappart8:monitor-httpd-on-watch           RUNNING   pid 885, uptime 16:51:03
slappart8:trafficserver-on-watch           RUNNING   pid 888, uptime 16:51:03
slappart8:trafficserver-reload             EXITED    May 22 04:16 PM
slappart9:bootstrap-monitor                EXITED    May 22 04:15 PM
slappart9:certificate_authority-on-watch   RUNNING   pid 681, uptime 16:52:02
slappart9:crond                            RUNNING   pid 684, uptime 16:52:02
slappart9:monitor-httpd-graceful           EXITED    May 22 04:15 PM
slappart9:monitor-httpd-on-watch           RUNNING   pid 680, uptime 16:52:02
watchdog                                   RUNNING   pid 26276, uptime 17:53:03
If the Frontend is running check if socat is working:
# ps aux | grep "socat"
root      3234  0.0  0.0  12728  2180 pts/0    S+   09:02   0:00 grep socat
If socat is not running anymore, redo the socat binding to reach the Frontend again.
Frontend Slave Running

If you go to your requested URL (master.slaptest.erp5.net) you can see that it points to the selected backend URL.
Should you have problems in loading the page, try restarting the Frontend by ssh-ing into your node, locating the frontend_apache-on-watch process and restarting it.
sudo su
# slapos node
slappart8:bootstrap-monitor                EXITED    Mar 20 02:28 PM
slappart8:certificate_authority-on-watch   RUNNING   pid 12137, uptime 0:33:54
slappart8:crond-on-watch                   RUNNING   pid 12125, uptime 0:33:54
slappart8:frontend-apache-safe-graceful    EXITED    Mar 20 02:28 PM
slappart8:frontend-nginx-safe-graceful     EXITED    Mar 20 02:28 PM
slappart8:frontend_apache-on-watch         EXITED    Mar 20 02:28 PM
slappart8:frontend_nginx-on-watch          RUNNING   pid 12136, uptime 0:33:54
slappart8:monitor-httpd-graceful           EXITED    Mar 20 02:28 PM
slappart8:monitor-httpd-on-watch           RUNNING   pid 12128, uptime 0:33:54
slappart8:trafficserver-on-watch           RUNNING   pid 12134, uptime 0:33:54
slappart8:trafficserver-reload             EXITED    Mar 20 02:28 PM
slappart9:bootstrap-monitor                EXITED    Mar 20 02:29 PM
slappart9:certificate_authority-on-watch   RUNNING   pid 11866, uptime 0:36:16
slappart9:crond                            RUNNING   pid 11867, uptime 0:36:16
slappart9:monitor-httpd-graceful           EXITED    Mar 20 02:29 PM
slappart9:monitor-httpd-on-watch           RUNNING   pid 11865, uptime 0:36:16
watchdog                                   RUNNING   pid 24426, uptime 7 days,...
To restart a service you can use slapos node restart slappart8:frontend_apache-on-watch.
Socat Port Forwarding

Refresh the page to show your instance and installation status.
You can follow the compilation by looking at the slapos-node-instance.log using:
# tail /opt/slapos/log/slapos-node-instance.log -f
or using slapos node instance directly.
As the Registry is listening on port 19201 and permissions in Linux systems prevent users from accessing ports below 1024, traffic must be forwarded.
This can be done using a Firewall with NAT traversal or using Socat. We will use Socat, a relay for bidirectional data transfer between two independent data channels. Data channels can be files, pipes, devices (terminal or modem, etc.), or sockets (Unix, IP4, IP6 - raw, UDP, TCP), etc. For more information, please refer to the Free Software Directory).
To install socat in case required, head to your terminal and:
sudo su
# apt-get install socat
Still in your terminal, start to see whether the Registry has finished installing (use # slapos node instance to follow installation):
# netstat -natp | grep 9201
tcp   0  0 10.0.27.44:9201       0.0.0.0:*          LISTEN       26027/python2.7
tcp   0  0 10.0.27.44:40706      10.0.27.44:9201    TIME_WAIT    -
tcp   0  0 10.0.27.44:40699      10.0.27.44:9201    TIME_WAIT    -
tcp   0  0 10.0.27.44.9201       10.0.27.44.:40655  TIME_WAIT    -
tcp   0  0 :::9201               :::*               LISTEN       26027/python2.7
Find the IP using:
# ifconfig eth0 | grep inet
            inet addr:167.114.246.26  Bcast:167.114.246.26  Mask:255.255.255.255
Then call Socat with the listening tcp entry and the inet addr:
# socat TCP4-LISTEN:9201,fork,bind=167.114.246.26 TCP4:10.0.27.44:9201 &
Note, that your Registry master-url in the example is 167.114.246.26:9201. SAVE # THIS URL. You will need to provide it whenever you want to connect a new node to the network.
To verify whether port forwarding works, you can:
# ps aux | grep socat

root 1954  0.0  0.0  19648  1748 pts/1 S  12:46 0:00 socat TCP4-LISTEN
  :9201,fork,bind=167.114.246.26 TCP4:10.0.232.26:9201
root 1963  0.0  0.0  12728  2224 pts/1 S+ 12:46 0:00 grep socat
root 3309  0.0  0.0  19648  2688 pts/0 S  09:03 0:00 socat TCP4-LISTEN
  :80,fork TCP6:[fc01::b566]:8080
root 3310  0.0  0.0  19648  2740 pts/0 S  09:03 0:00 socat TCP4-LISTEN
  :443,fork TCP6:[fc01::b566]:4443
Before finishing make sure that any temporary IPv6 address space added during installation of the SlapOS node itself is removed. On your terminal, run:
sudo su
# ip -6 addr del fc01::1/32 dev lo
IPv6 will be reset when the first (gateway) node is being created.